Learning how to grow green beans from seed is one of the easier wins in a vegetable garden: the seeds germinate readily, the plants ask for very little, and most gardeners get a real harvest on the first try. What’s less straightforward is what beans actually do for your soil. The popular advice to “plant beans to fix your soil” gets repeated constantly and is substantially overstated, and correcting it honestly is a big part of what this guide is for.
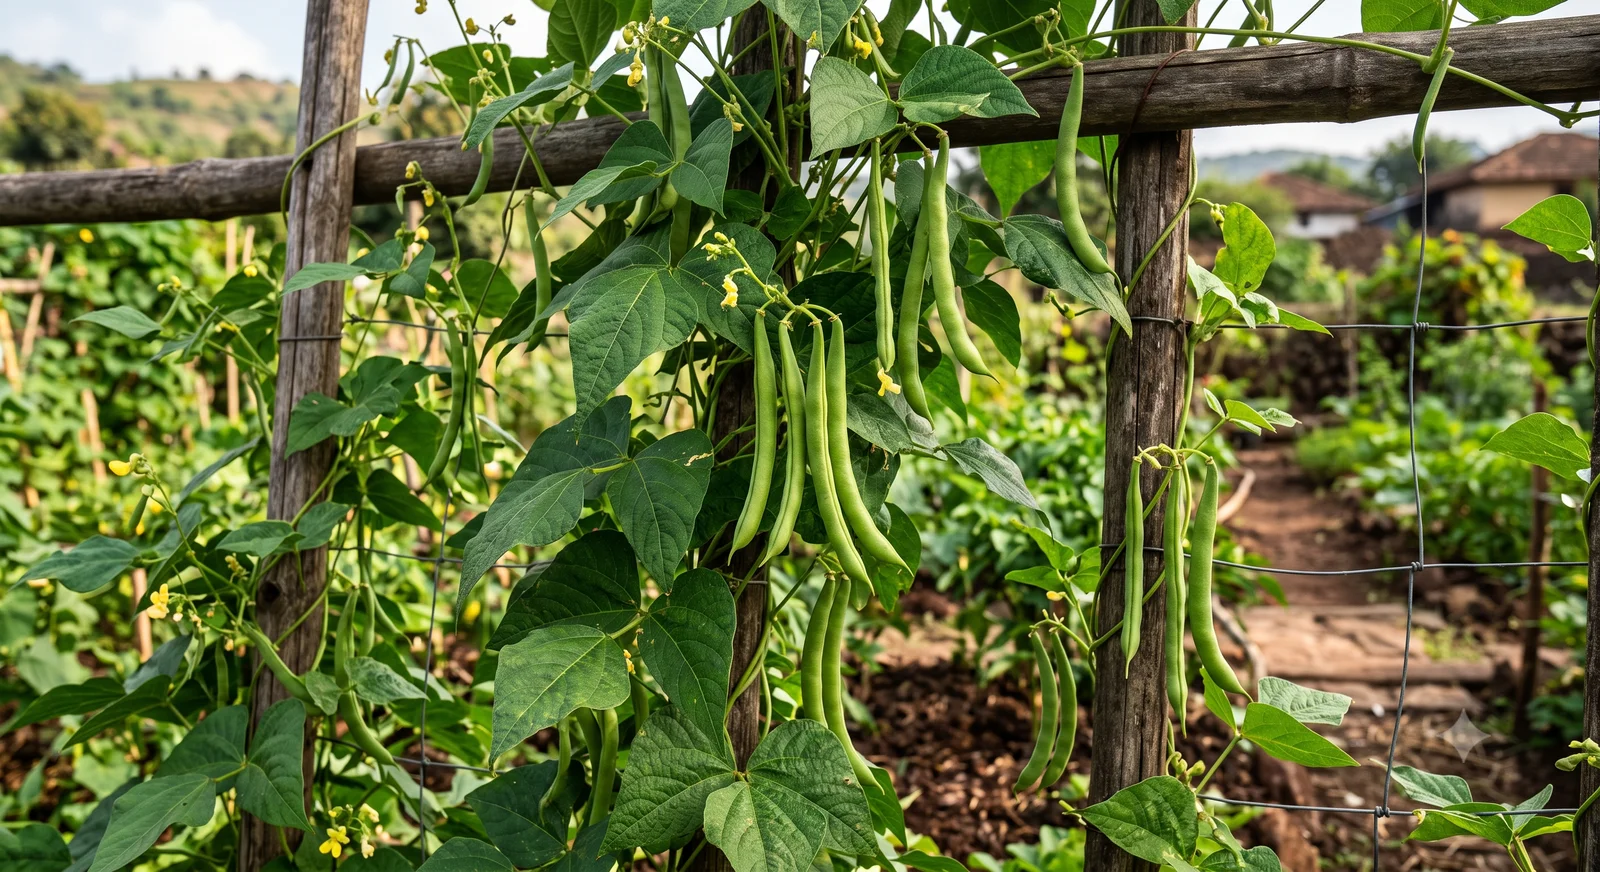
Direct Sow Only: Especially Pole Beans
Beans are the sixth pattern in this seed-starting series, and they join carrots in the direct-sow-only camp. Beans generally don’t transplant well: disturbing the root system sets the plant back, sometimes badly. Pole beans are the least forgiving of all: they shouldn’t be started indoors at all, since the vigorous, sensitive root system they need for climbing rarely recovers from a transplant. Bush beans can tolerate an indoor start in a pinch if you’re really trying to get a jump on the season, but it’s not the standard approach and direct sowing remains the more reliable path for both types.
That puts beans in different company than most of the rest of this series. Tomatoes and peppers need an indoor head start in most climates. Lettuce and cucumbers genuinely work either way. Carrots and beans both skip the indoor stage entirely, though for different reasons: a carrot’s taproot forks if disturbed, while a bean’s whole root system just struggles to re-establish once it’s been moved.
Soil Temperature: The 60°F Threshold
Bean seed planted in cold soil doesn’t sit and wait patiently for things to warm up: it rots. Clemson Cooperative Extension is specific about the cutoff: don’t plant beans before the soil temperature is at least 60°F at a 4-inch depth. University of Minnesota Extension echoes the same warning, noting that bean seed planted in cold soil may rot rather than germinate, and that plant growth stays slow even after germination in cooler weather.
The other end of the range matters too. Beans are also frost-tender: a light frost kills the plants outright, so there’s no early-planting workaround the way there is with cold-hardy crops. And on the hot end, Clemson notes that temperatures above 90°F can cause blossom drop, especially in some snap bean varieties; plants typically resume setting pods once temperatures cool back down. If you don’t yet know your last frost date, our Frost Date Calculator estimates it by ZIP code.
Bush Beans vs. Pole Beans
If you’re figuring out how to grow bush beans versus pole beans, this is a real decision point, not just a flavor of the same plant: the two growth habits produce beans on genuinely different timelines and in different quantities.
Bush beans are compact, upright plants that need no support and mature faster than pole types. Their tradeoff is concentrated production: bush beans flower and set pods in a short window, which means you get a large harvest all at once rather than a steady trickle. That’s actually an advantage if you’re canning or freezing in batches, and it makes bush beans well suited to succession sowing: UMN Extension specifically recommends planting a new round every two weeks through early August to keep a supply coming, since any single planting will only produce heavily for a limited stretch. Our Succession Planting guide covers the staggered-sowing approach in more depth.
Pole beans need a trellis, teepee of poles, or similar support, and take longer to reach their first harvest. In exchange, they keep flowering and producing new pods all season, right up until frost, so there’s no need to stagger plantings the way you would with bush beans: one planting keeps feeding you. Pole beans also handle a short stretch of extreme heat better: UMN notes that a hot spell during flowering may cause bush beans to fail to set fruit for that window, while pole beans typically lose only a few pods and resume normal production once temperatures moderate. Pole beans generally yield more per square foot of ground too, since they grow up instead of out. See our Bean Plant Spacing guide for the full bush-vs-pole breakdown, or use our Plant Spacing Calculator, which has separate figures for bush and pole beans if you’re planning out a bed.
The Nitrogen Myth: What Beans Actually Do for Your Soil
Here’s the part of common bean advice that needs a real correction. Beans themselves don’t fix nitrogen: Rhizobium bacteria living in nodules on the bean’s roots do the actual fixing, converting nitrogen gas from the air into a form the plant can use. The bean plant’s role is to host the bacteria and supply them with sugars from photosynthesis in exchange. It’s a genuine partnership, but it’s the bacteria doing the chemistry, not the plant itself.
And common garden beans are relatively poor at this compared to other legumes. Per New Mexico State University Extension, common beans are poor nitrogen fixers, typically fixing under 50 lb of nitrogen per acre. In fact, NMSU notes that beans grown for maximum yield in New Mexico still need an additional 30–50 lb of fertilizer nitrogen per acre on top of what they fix themselves. Compare that to soybeans, cowpeas, peanuts, and fava beans, which are genuinely good nitrogen fixers capable of fixing up to 250 lb of nitrogen per acre, enough to cover essentially all of their own needs without added fertilizer. If you’ve heard that “beans fix nitrogen” as a blanket statement, it’s really true of that second group far more than it is of the bush and pole beans in a typical vegetable garden.
There’s a twist that makes the popular advice even less useful in practice: adding nitrogen fertilizer actively suppresses fixation. NMSU Extension notes that when excessive nitrogen is applied, the plant slows or shuts down its own nitrogen-fixing process, since it’s less work for the plant to simply absorb nitrogen already available in the soil than to fix it from the air. So a heavily fertilized bean plant isn’t fixing much of anything: the “soil-building” benefit and a nitrogen-rich fertilizing routine actively work against each other.
You can actually check whether fixation is happening, and it’s a satisfying bit of garden science. Pull a plant and cut open one of the small round nodules on its roots. Pink or red inside means it’s actively fixing nitrogen: that color comes from leghemoglobin, a compound similar to hemoglobin that controls oxygen flow to the bacteria. White or gray means the nodule is young and hasn’t started fixing yet. Green means fixation has already stopped, which NMSU notes happens naturally once a plant shifts its energy toward filling pods late in the season.
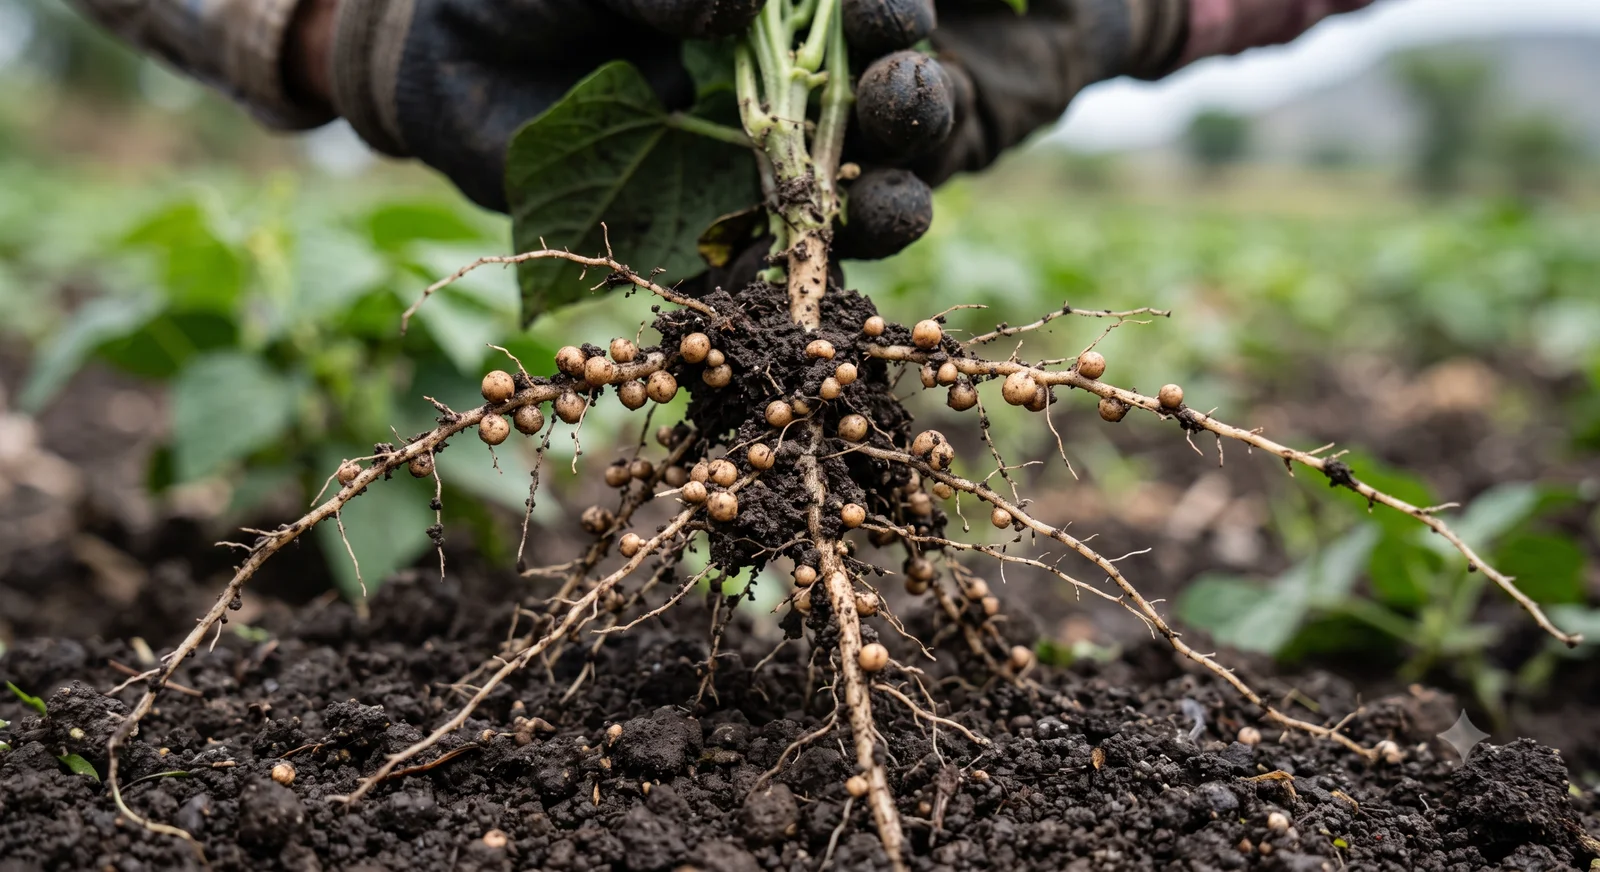
The practical upshot: beans are a modest soil improver at best, not a substitute for real soil building. Most of the nitrogen a bean plant fixes goes into growing the plant and its pods, and when you harvest the beans, a lot of that nitrogen leaves the garden with them. Some does return to the soil as roots and leftover plant matter break down, but it’s a small, gradual contribution, not the soil-transforming effect the popular version of this advice implies. If your soil genuinely needs rebuilding, beans can be part of a rotation, but they’re not a fix on their own.
Should You Use a Bean Inoculant?
Many garden soils already have enough native Rhizobium bacteria to nodulate beans on their own, particularly if beans or other legumes have grown there before. New, raised, or heavily amended beds are a different story: soil that’s never hosted legumes may simply lack a population of the right bacteria, in which case even a healthy-looking bean plant might form few or no nodules.
A powdered Rhizobium phaseoli inoculant costs a few dollars and is worth using in exactly that situation: shake a little of the powder into the seed packet before planting, coating the seed, per UMN Extension’s guidance. Just make sure you’re buying inoculant labeled for beans specifically, not for peas: the bacteria strains aren’t interchangeable between legume types.
One myth worth correcting directly: inoculant does not speed up germination. It has nothing to do with how fast the seed sprouts: its only job is improving nodulation and nitrogen fixation once the plant is established. If you’re looking for faster germination, that comes down to soil temperature and moisture, not inoculant.
Fertilizing Beans (Less Than You Think)
Given how the nitrogen picture actually works, it makes sense that beans want comparatively little fertilizer, and that what they do want is deliberately low in nitrogen. Clemson Cooperative Extension recommends, absent a soil test, applying a balanced 5-10-10 fertilizer at about 3 lbs per 100 sq ft worked into the soil before planting. Pushing nitrogen higher than that isn’t just unnecessary: a high-nitrogen fertilizer encourages leafy, vigorous top growth at the direct expense of flowering and pod set, which is the opposite of what you actually want from a bean plant.
Soil pH matters more than most gardeners expect here too. Clemson’s target range is 5.8–6.5, while UMN Extension gives a slightly broader 6.0–7.0; either way, the rhizobia bacteria that do the actual nitrogen fixing become less active as soil drifts more acidic, so staying inside that range supports both plant growth and nodulation together. On the other end, soil above roughly 7.5 tends to cause iron and manganese deficiency symptoms in beans, same as with many other vegetables. If your soil runs acidic, wood ash is a genuine fix, since its main effect is raising pH. Our Homemade Fertilizers article covers wood ash and exactly how to apply it without overdoing it. For dosing any fertilizer more precisely than “3 lbs per 100 sq ft,” our NPK Calculator can help.
Types of Beans by How You Eat Them
Bean varieties are easier to sort by how you plan to eat them than by name, since that’s the decision that actually changes how and when you harvest.
Fresh-eating beans (green, snap, or string beans) are picked immature, pod and all, before the seeds inside have sized up and while the pod is still tender enough to snap cleanly. This is what most people picture when they hear “green beans,” and it covers most bush and pole varieties grown in home gardens.
Shelling beans, like limas and favas, are grown to a later stage: the pod is discarded and only the seed inside is eaten, usually while it’s still fresh and soft rather than fully dried. One important flag here: fava beans are cool-season, unlike every other bean in this guide and unlike most of the crops in this series. UMN Extension notes favas want conditions closer to peas: cool temperatures, planted early in spring, and they’ll set only a handful of pods before hot weather shuts them down. If you’re growing favas, the warm-season timing advice throughout the rest of this guide doesn’t apply to them.
Dry or storage beans (pinto, black, navy, kidney, and similar types) stay on the plant until the pods and seeds have dried completely and the beans rattle inside. These are the type most often sold in bags at the grocery store, and they keep for a long time once dried and stored properly.
Runner beans, most commonly scarlet runner, are a bit of a dual-purpose case. University of Wisconsin Extension notes scarlet runner bean is grown in the US mostly as an ornamental for its showy red flowers, which draw hummingbirds, though the pods are genuinely edible and can be used like snap beans when picked young, or shelled and dried like any other bean later in the season.
Can You Grow Beans From a Bag of Dried Beans?
Sometimes. If you’re wondering how to grow beans from dry beans sitting in your pantry rather than a seed packet, the honest answer is that it can work, but it’s a gamble. Grocery store dried beans are food-grade, not seed-grade, and that distinction matters more than it might seem. They’re bred and processed for cooking, not germination, so viability is unpredictable: they may simply be old, they aren’t screened for the seed-borne diseases that packaged garden seed is checked for, and the variety on the shelf may not be well suited to your specific climate or season length the way a seed catalog variety chosen for your region would be.
It’s a genuinely fun, cheap experiment, and it sometimes works fine, especially with beans that haven’t sat in a warehouse for years. It’s just not something to rely on for a main crop you’re counting on. If you want to know before committing a row of soil to them, test a sample with the damp paper towel method. Our cucumber guide covers that technique in detail, and it works the same way for beans: a damp paper towel, a sealed bag, and a few days to see whether roots actually emerge.
Growing Beans in Containers
Bush varieties are the clearly better choice for pots: their compact, self-supporting habit fits a container’s limits far more comfortably than a pole variety that wants to climb 6 feet or more. Our Pot Size Calculator puts beans in the 4–6 gallon range with 8–12 inches of depth, which comfortably fits several bush bean plants in one container.
If you do want to grow pole beans in a container, you’ll need a pot large and stable enough to anchor a proper trellis or set of poles without tipping, plus a container deep enough to support that much root growth. For most container gardeners, though, bush beans are simply the easier, more proportionate choice.
Free book · 23 pages, PDF
Growing Beans from Seed FAQ
How long does it take to grow beans from seed?
Snap beans are typically ready to harvest around 55 days after planting, per Clemson Cooperative Extension, though the exact number depends on the variety. Pole beans generally take a bit longer to reach their first harvest than bush beans, but then keep producing for the rest of the season, while bush beans mature faster but in a shorter, more concentrated window.
Should you soak bean seeds before planting?
It's optional, not necessary. A brief soak of a few hours can soften the seed coat and speed germination slightly, but bean seed germinates readily on its own in warm soil without it. Soaking too long, especially overnight or longer, can actually cause seeds to split or rot, so if you soak at all, keep it short.
Do bean seeds need light to germinate?
No, bean seeds germinate underground in the dark and don't need any light exposure to sprout. Plant them about 1 inch deep, per Clemson and UMN Extension guidance, and cover them completely with soil.
How do you know when green beans are ready to harvest?
Pick snap beans while the pod is still smooth and tender, before the individual seeds inside have grown large enough to visibly bulge the pod. A ready pod typically snaps cleanly when bent. Waiting too long produces tougher, more fibrous pods, and letting mature pods sit on the plant also signals it to slow down new flower and pod production.
Should green beans be planted next to tomatoes?
Our own Companion Planting Chart doesn't list any conflict between beans and tomatoes, so there's no documented reason to keep them apart, but it's also not a classic companion pairing the chart highlights either. Beans are listed as a good companion for cucumbers specifically, and as one to keep away from onions and chives, which compete with beans more directly.
Sources & further reading
For planting, bean types, and general care, see University of Minnesota Extension’s guide to growing beans in home gardens. For bush and pole variety specifics, spacing, and fertilizing, see Clemson Cooperative Extension’s guide to bush and pole-type snap beans. For the nitrogen fixation figures and nodule diagnostics, see New Mexico State University Extension’s guide to nitrogen fixation by legumes. For scarlet runner beans specifically, see University of Wisconsin Extension’s guide to scarlet runner bean. For more on how we source and review the facts behind every calculator and guide on this site, see our methodology page. And for more on spacing, timing, and companion planting across the whole garden, see our complete guide to spacing and planting.