Most mulch mistakes are invisible at the moment you make them. Piling mulch against a trunk, laying it on before the soil has warmed, or just eyeballing the amount doesn’t look wrong today. The real damage from these mulch mistakes shows up months or years later, as a weak trunk, a stalled bed, or a lawn that never quite got what it needed. Here are the eight that quietly cause the most damage, and exactly what to do instead.
1. Volcano Mulching: The Classic Tree Mulching Mistake
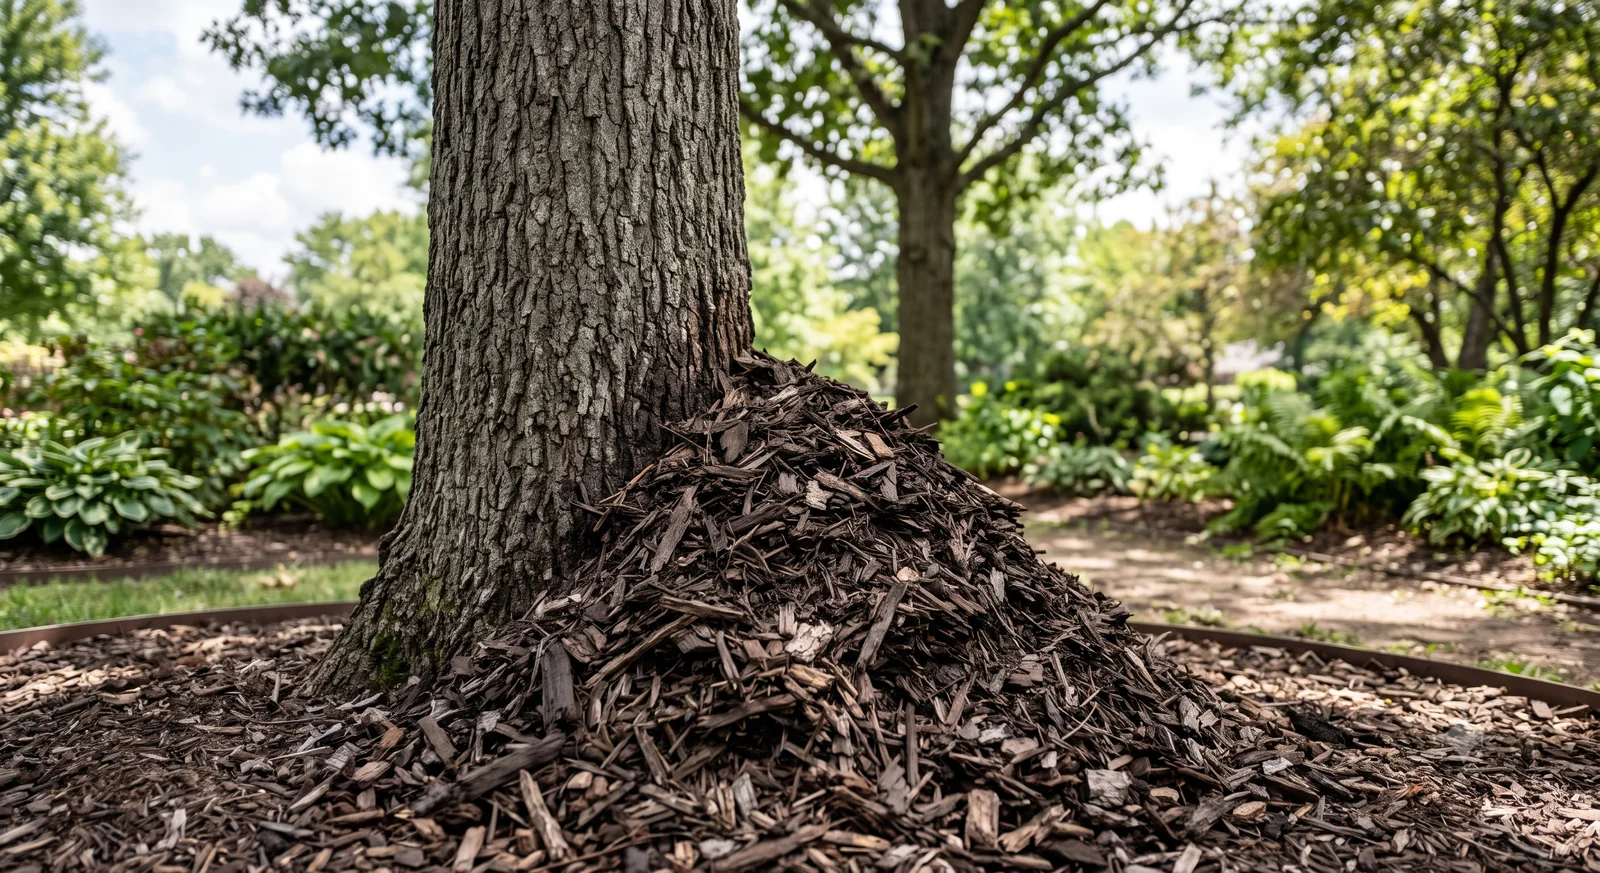
This is the most common tree mulching mistake, and the same error shows up around a perennial’s stem too: mulch piled against bark instead of spread flat around it. Piled mulch traps moisture against bark, inviting rot, disease, and pests. On trees specifically, it also buries the root flare, where trunk widens into roots, blocking oxygen exchange, and can trigger adventitious roots that circle back and girdle the trunk instead of growing outward. Fix it with the 3-3-3 method: mulch 3+ inches from the trunk or flare, no more than 3–4 inches deep, in a ring about 3 feet across. If girdling roots have already formed, root collar excavation, exposing the flare and cutting circling roots, is the real fix, not a job for a casual shovel.
2. Layering It Too Thick
More mulch is not more protection. Past roughly 3–4 inches deep, mulch stops moderating soil conditions and starts suffocating what’s underneath: roots need oxygen exchange with the surface, and a thick, compacted layer blocks that the same way waterlogged soil does. A too-thick layer also holds constant moisture at the surface, which is exactly the environment rodents and certain insects look for to nest or feed in. If you’re not sure how deep your bed sits, measure it: a tape measure pushed straight down to the soil line takes ten seconds and tells you whether you’re in the safe range or need to pull some back.
3. Skipping Weed Prep First
Mulch is prevention, not a cure. A fresh layer blocks new weed seeds from getting the light they need to germinate, but it does little against weeds already established in the bed, and almost nothing against rhizomatous weeds that spread by underground roots or stems: those will push straight up through several inches of mulch without much trouble. Mulching over an already-weedy bed just hides the problem while it keeps spreading underneath. Pull or dig out existing weeds and get rhizomatous roots out of the soil first, then mulch the cleared bed: that order is what actually delivers the weed suppression mulch is supposed to provide.
4. Using the Wrong Mulch for the Job
Not all mulch behaves the same once it’s down. Fresh, uncomposted wood chips can temporarily pull nitrogen out of the soil as microbes work to break them down, usually limited to the top inch or two where mulch meets soil. Let wood chips age and partially compost first, or supplement nitrogen if using them fresh. Rubber mulch is a different problem: it doesn’t break down or feed soil biology, and can leach chemicals over time, a real concern near food crops. Sourcing matters too: cheap or free mulch from municipal or unknown sources can carry herbicide or pesticide residue that damages the plants you’re trying to help.
5. Mulching at the Wrong Time
Mulch moderates soil temperature, which is exactly why applying it too early in spring backfires. A layer put down before the soil has actually warmed insulates cold ground, keeping it cooler longer and delaying the warming that triggers root growth and seed germination. The result is a slower start to the season, not a head start. Let the soil warm on its own first, once the growing season is genuinely underway, and mulch after that point, not as a first step before anything is growing.
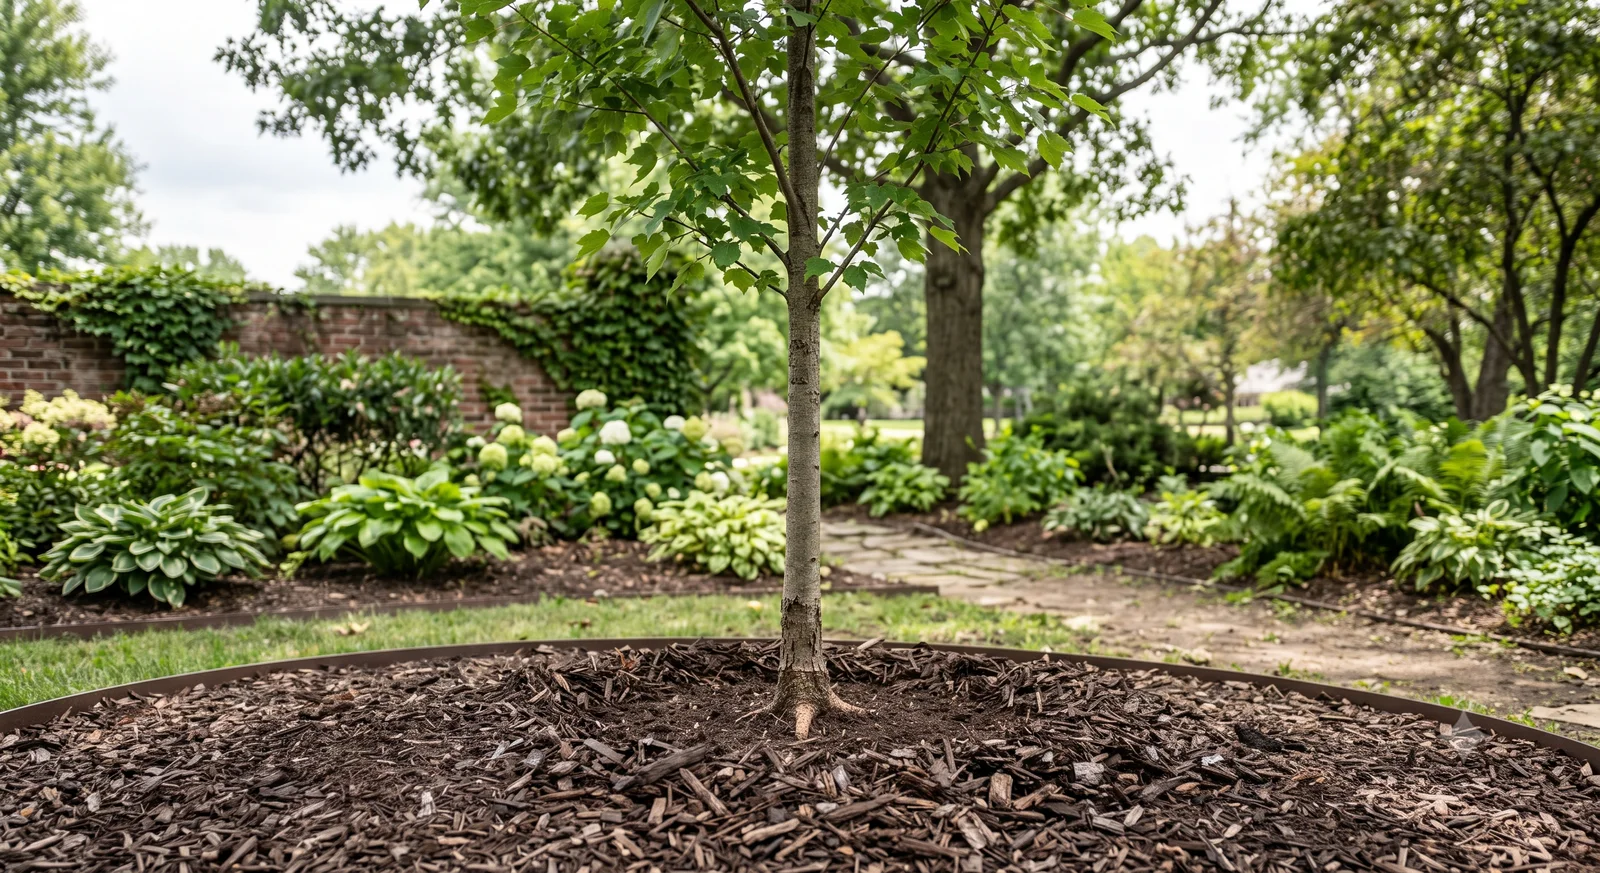
Mistake #1’s fix in practice: mulch pulled back into a flat, donut-shaped ring, with the trunk and root flare left clear.
6. Letting Old Mulch Go Hydrophobic
Mulch is supposed to hold moisture in, but old, decomposed, dried-out mulch can do the opposite. As it breaks down and dries repeatedly, fine particles can bind into a dense, matted crust that actually repels water instead of absorbing it: water runs off the surface instead of soaking through to the soil, defeating the entire purpose of having mulch there. This is easy to miss, since the bed still looks mulched from a few feet away. Break up any compacted or matted patches with a rake periodically, especially in beds that haven’t been disturbed in a full season or more.
7. Never Refreshing It
Mulch is not a one-time purchase. It breaks down continuously, and a layer that started at 3 inches can thin to under an inch within a year or two without anyone noticing, since the loss happens gradually. As it thins, weed suppression and moisture retention fade right along with it, well before the bed looks obviously bare. Check your mulch depth at least once a year (the same tape-measure check from mistake #2) and top up to your target depth rather than assuming last year’s application is still doing its job.
8. Guessing the Amount Instead of Calculating It
The last mistake is the most avoidable: ordering mulch by eye instead of doing the math. Guess low and you run short mid-project, with an unfinished bed until you get back to the store. Guess high and you’ve overpaid for mulch that sits unused or gets piled too deep, which is how mistake #2 usually happens. The actual calculation is simple (area times depth, converted into cubic feet, yards, or bags) but it’s easy to get wrong by hand across an irregular bed. Our free Mulch Calculator does that conversion for you, so you order exactly what the bed needs the first time.
Free book · 23 pages, PDF
FAQ
Chipped mulch or shredded mulch: which is better for plants?
Both work well for most plants: the real difference is in behavior, not which feeds soil better. Shredded mulch tends to mat together, which helps it stay put on slopes or windy sites instead of blowing or washing away. Chipped mulch stays looser, letting water and air move through a bit more easily. For a flat garden bed, pick whichever you like the look of.
Is stone or mulch better?
It depends on what's growing there. Mulch is the better choice anywhere plants are actively growing, since it breaks down and feeds the soil over time. Stone is the better choice for paths, dry landscaping, and areas near a foundation, since it doesn't decompose, though it also absorbs and radiates more heat, which can stress nearby plants in hot climates.
What kind of mulch works best in a vegetable garden?
Straw, shredded leaves, and untreated grass clippings are the most popular choices for vegetable beds, since they break down relatively fast and add organic matter right where annual crops need it most. Avoid dyed or chemically treated wood mulches near food crops: they're built to last in ornamental beds, which works against what a vegetable bed needs season to season.
How often should garden mulch be replaced?
Most organic mulch needs topping off about once a year as it breaks down, but a full replacement usually isn't necessary. Check the depth first (see mistake #7 above) and add only enough to get back to 2–3 inches, rather than piling a fresh full layer on top of what's already there.
What are the benefits of freshly laid mulch?
Fresh mulch suppresses weeds, holds soil moisture so you water less often, moderates soil temperature swings, and, if it's organic, slowly feeds the soil as it breaks down. Those benefits fade as the mulch ages, mats down, or thins out, which is exactly why refreshing it correctly (mistake #7) matters.
Sources & further reading
The volcano-mulching mechanism described above follows the University of Vermont Extension’s Beware the Mulch Volcano. For more on how we source and review the facts and formulas behind every calculator and guide on this site, see our methodology page. And for the full picture on mulch alongside topsoil, garden soil, and compost in a complete planting project, see our complete guide to soil and amendments.